

The basic version of Leonardo AI is available for free, although it comes with a daily limit of 150 tokens. For those who need more capabilities and fewer restrictions, premium plans start at $10 per month. However, the free version is sufficient for most beginners. It is recommended to try the free version before opting for the paid one. Here is your guide to creating images with Leonardo AI.
Here are 5 steps to get started with Leonardo AI:
Start:
Go to the Leonardo AI App:
You can sign in with your Apple, Google, Microsoft account, or email account. Then, sign in with your newly created account.
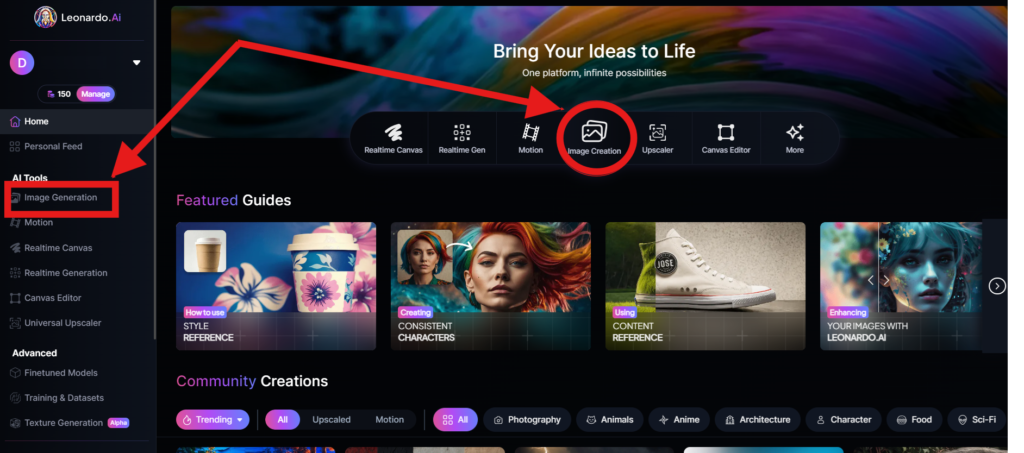
Navigate to the image creation tool
On the app.leonardo.ai homepage, select the ‘Image Generation’ option from the left panel, click on the icon in the middle or use the ‘Image Creation’ button located in the middle
Create your first image
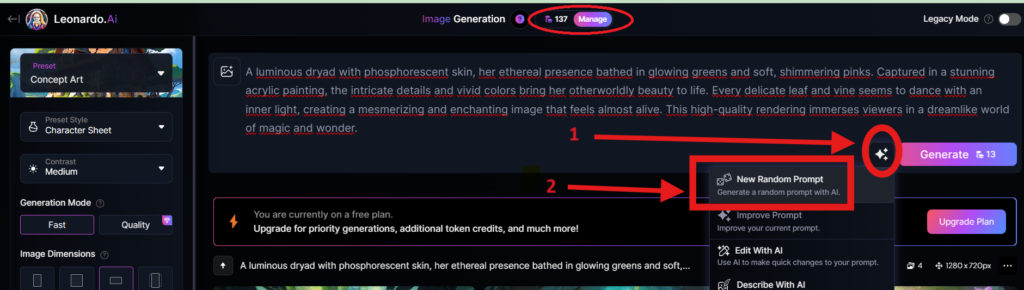
In the prompt field at the top you can immediately create your desired Image. Or you can also create a reminder with the available AI suggestions in 2 ways:
+ Generate a random photo: 1, Click to “New Random Prompt” then 2. click Generate
+ Create a photo with an AI description by an image that you want to get the original idea. Then you edit according to your creativity
Wait about 20 seconds for Leonardo AI to generate the images, and you will receive four stunning high-resolution images as follows:
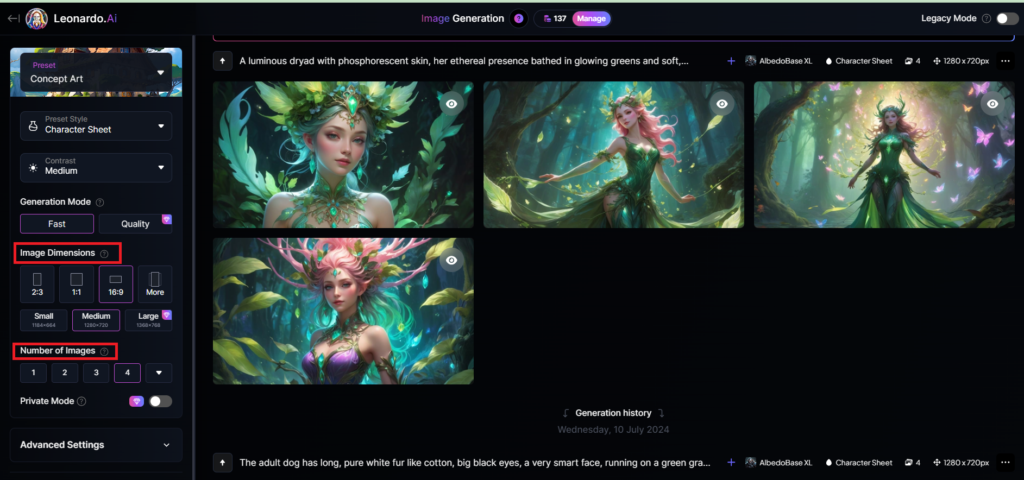
You can select the image size in the “Image Dimensions” section, which includes sizes like 2:3, 1:1, 16:9, and more options under “More” on the left. Alternatively, you can choose the number of images in the “Number of Images” section, with a maximum of 8 images that can be generated.
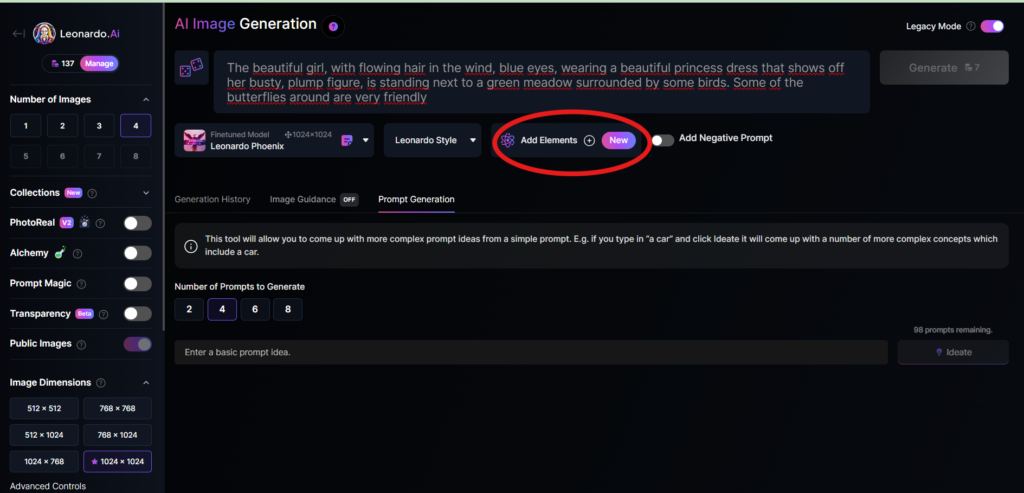
Add Elements
Use the drop-down menu under “Add Elements” to select a specific element such as Coloring Book, Folk Art Illustration, Children’s Illustration, Cartoon & Anime, or Classic Style Christmas Illustration. Although you can select multiple elements, Leonardo advises that choosing more than two elements may lead to unpredictable results.
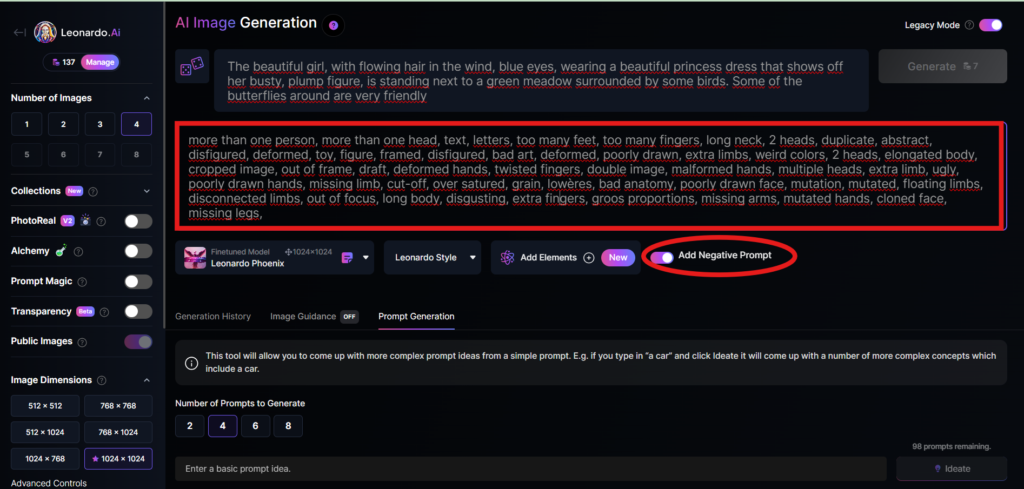
Add a negative prompt
As in the example above, I created negative prompts to ensure the resulting images were error-free, including: “more than one person, more than one head, text, letters, too many feet, too many fingers, long neck, 2 heads, duplicate, abstract, disfigured, deformed, toy, figure, framed, disfigured, bad art, deformed, poorly drawn, extra limbs, weird colors, 2 heads, elongated body, cropped image, out of frame, draft, deformed hands, twisted fingers, double image, malformed hands, multiple heads, extra limb, ugly, poorly drawn hands, missing limb, cut-off, over satured, grain, lowères, bad anatomy, poorly drawn face, mutation, mutated, floating limbs, disconnected limbs, out of focus, long body, disgusting, extra fingers, groos proportions, missing arms, mutated hands, cloned face, missing legs,”
Here are the basic steps for new users to create a simple image with Leonardo AI. In the next article, I will guide you through advanced details to create various types of images for different purposes. You can start your free trial with Leonardo AI here:


Access drug details. https://mexmedcare.shop/# Drug pamphlet provided. costco pharmacy online
Moving across states from Redlands is much easier when professionals handle the heavy lifting and transport. This may help others planning a move: local moving companies Redlands
This is very insightful. Check out window repair Alexandra Palace for more.
Useful advice! For more, visit window repairs .
Hello my loved one! I wish to say that this post is amazing, great written and include approximately all vital infos.
I would like to look extra posts like this .
whoah this blog is excellent i really like studying your articles.
Stay up the good work! You recognize, lots of individuals are hunting round for
this info, you can aid them greatly.
I found this very helpful. For additional info, visit glazing company Tufnell Park .
Siding Installation estimates are easier to compare when the materials are listed clearly.
What should homeowners ask before scheduling Siding Installation for an older house?
This guide to Siding Installation makes the planning process easier to follow Siding Installation
Hello friends! Let me drop my quick honest thoughts!
I am Brittany, a full-time mom-to-be who a few months ago learned how to navigate the Paybis platform.
Back when I was complete beginner, I was terrified of complex trading terminals.
But Paybis changed the whole game for me because
there are no complex order books.
Here is my actual financial breakdown: I started out with a
small seed capital of $400 from my personal savings.
By using 0% fee initial card purchases on Paybis, I routinely bought crypto assets during local
price dips and off-ramped straight to my credit card whenever
prices swung up. Over the past 6 months, I managed
to turn that small sum into over $18,500! The absolute highlight is that Paybis processed all my fiat withdrawals
without delays.
Now for the most exciting news: I am expecting my little one very soon! Thanks
to these crypto and fiat profits, we have cleared all our debts!
This money is directly paying for:
1. a dedicated private obstetrician and birth plan (around $4,500).
2. fully furnishing our baby’s room (costing $2,200).
3. A premium all-terrain stroller system and smart convertible
car seat (about $1,600).
4. a hefty emergency fund for baby supplies (totaling $3,000).
5. an initial deposit into a high-yield savings fund for our baby!
If a pregnant housewife like me can learn Paybis and master crypto/fiat deals, you can definitely do it too!
Sending positive vibes to everyone!
Wonderful tips! Discover more at residential glazing .
This was quite enlightening. Check out emergency glazier Winchmore Hill for more.
Thanks for the informative post. More at emergency glazier Regents Park .
This was a fantastic resource. Check out external glazing Archway for more.
Great article! We will be linking to this great post on our
website. Keep up the great writing.
Here is my page early critical illness insurance singapore
If you’re in Barcelona and need emergency locksmith suggestions, go to locksmith barcelona .
This was highly helpful. For more, visit window glass repair Swiss Cottage .
https://www.annuncigratuititalia.it/author/insidesgv99/
Thanks for the helpful advice. Discover more at Hampstead window repair services .
Thanks for the great explanation. More info at trusted glazier Neasden .
Чухлома купить Метадон VHQ кокаин купить Светлогорск купить Мефедрон елкие камни/мука] HQ Шумиха купить закладку Мефедрон 2.0]
Циолковский купить Ecstasy: UPS 280mg Тетюши купить гидропонику