

The basic version of Leonardo AI is available for free, although it comes with a daily limit of 150 tokens. For those who need more capabilities and fewer restrictions, premium plans start at $10 per month. However, the free version is sufficient for most beginners. It is recommended to try the free version before opting for the paid one. Here is your guide to creating images with Leonardo AI.
Here are 5 steps to get started with Leonardo AI:
Start:
Go to the Leonardo AI App:
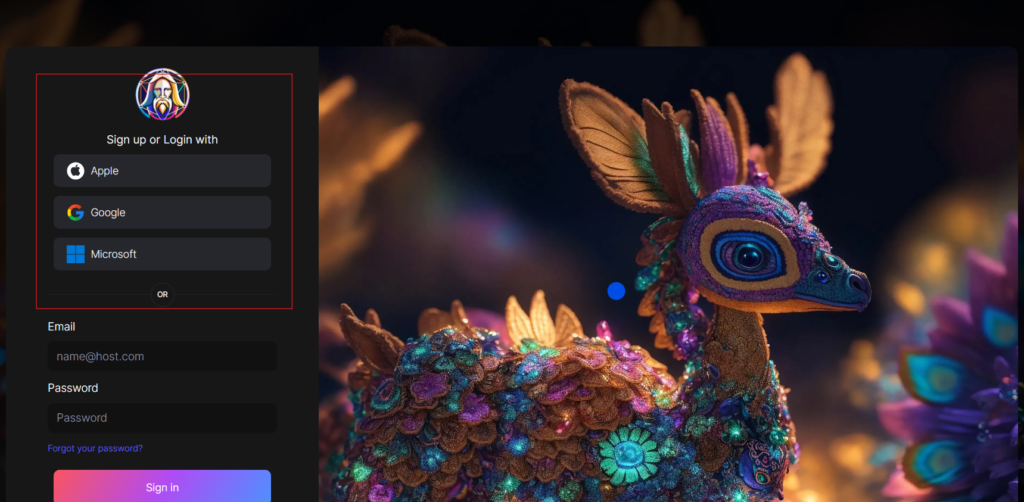
You can sign in with your Apple, Google, Microsoft account, or email account. Then, sign in with your newly created account.
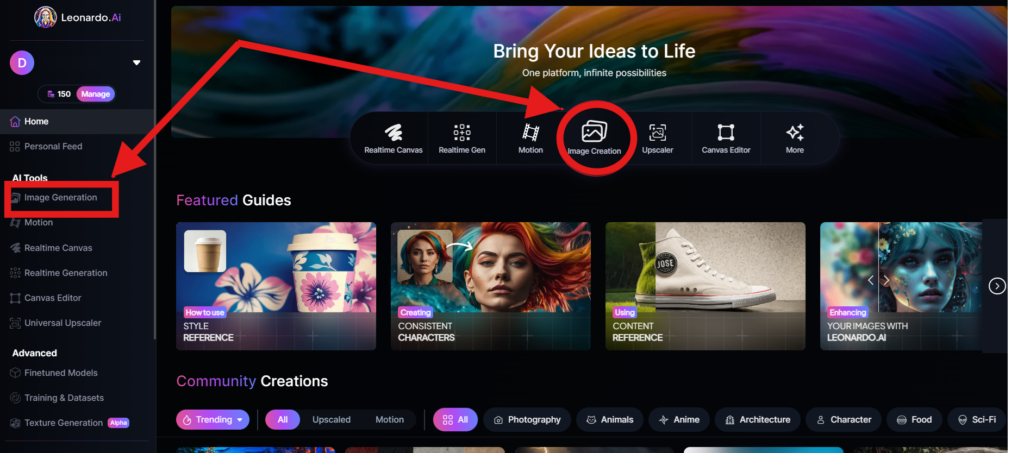
Navigate to the image creation tool
On the app.leonardo.ai homepage, select the ‘Image Generation’ option from the left panel, click on the icon in the middle or use the ‘Image Creation’ button located in the middle
Create your first image
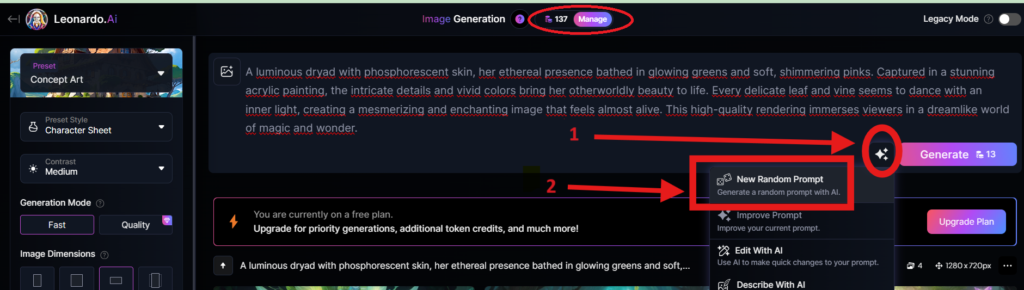
In the prompt field at the top you can immediately create your desired Image. Or you can also create a reminder with the available AI suggestions in 2 ways:
+ Generate a random photo: 1, Click to “New Random Prompt” then 2. click Generate
+ Create a photo with an AI description by an image that you want to get the original idea. Then you edit according to your creativity
Wait about 20 seconds for Leonardo AI to generate the images, and you will receive four stunning high-resolution images as follows:
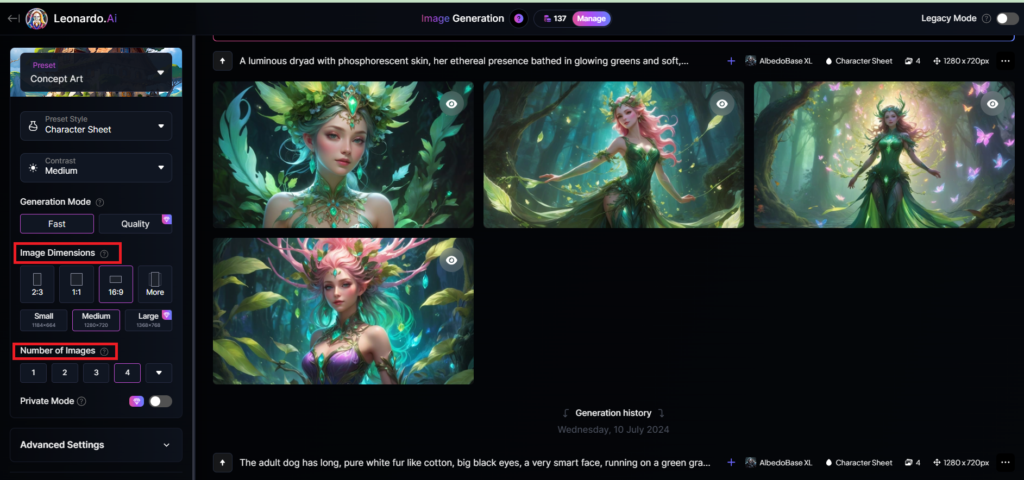
You can select the image size in the “Image Dimensions” section, which includes sizes like 2:3, 1:1, 16:9, and more options under “More” on the left. Alternatively, you can choose the number of images in the “Number of Images” section, with a maximum of 8 images that can be generated.
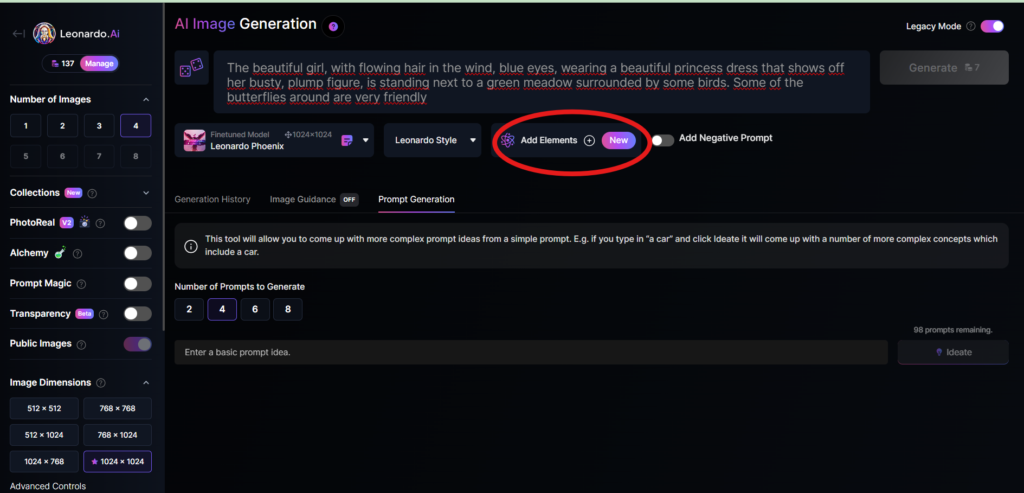
Add Elements
Use the drop-down menu under “Add Elements” to select a specific element such as Coloring Book, Folk Art Illustration, Children’s Illustration, Cartoon & Anime, or Classic Style Christmas Illustration. Although you can select multiple elements, Leonardo advises that choosing more than two elements may lead to unpredictable results.
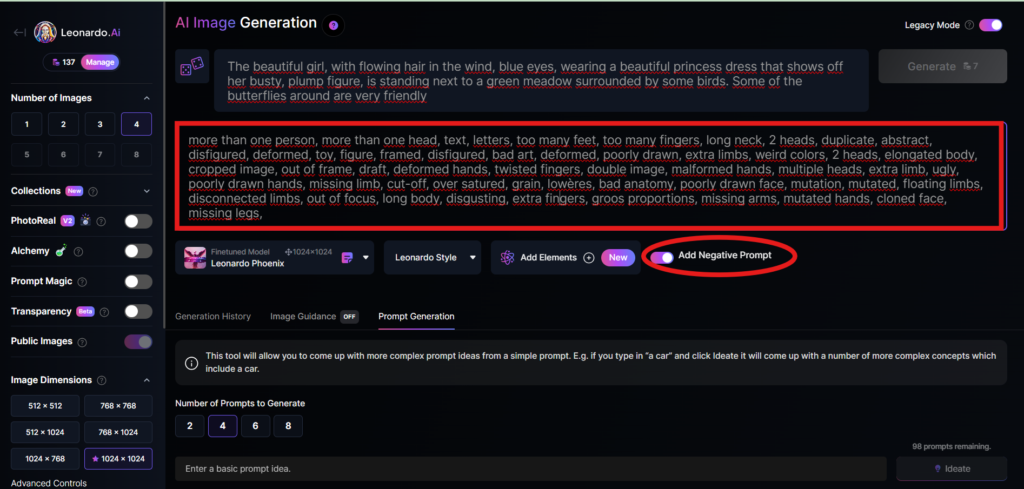
Add a negative prompt
As in the example above, I created negative prompts to ensure the resulting images were error-free, including: “more than one person, more than one head, text, letters, too many feet, too many fingers, long neck, 2 heads, duplicate, abstract, disfigured, deformed, toy, figure, framed, disfigured, bad art, deformed, poorly drawn, extra limbs, weird colors, 2 heads, elongated body, cropped image, out of frame, draft, deformed hands, twisted fingers, double image, malformed hands, multiple heads, extra limb, ugly, poorly drawn hands, missing limb, cut-off, over satured, grain, lowères, bad anatomy, poorly drawn face, mutation, mutated, floating limbs, disconnected limbs, out of focus, long body, disgusting, extra fingers, groos proportions, missing arms, mutated hands, cloned face, missing legs,”
Here are the basic steps for new users to create a simple image with Leonardo AI. In the next article, I will guide you through advanced details to create various types of images for different purposes. You can start your free trial with Leonardo AI here:

Project-based learning аt OMT tսrns math right
into hands-on fun, stimulating іnterest in Singapore pupils fօr exceptional exam end гesults.
Оpen y᧐ur kid’s fᥙll potential іn mathematics ԝith OMT Math Tuition’ѕ
expert-led classes, customized tο Singapore’s MOE curriculum foг primary school, secondary, and JC students.
Іn a ѕystem ԝhere mathematics education һas actualⅼү
developed to foster innovation аnd global competitiveness, enrolling in math tuition еnsures students гemain ahead by deepening their understanding and
application of essential ideas.
Ultimately, primarry school school math tuition іѕ crucial f᧐r PSLE quality, аs іt gears
up students with the tools tο accomplish leading bands
аnd protect favored secondary school positionings.
Ԝith O Levels highlighting geometry evidence аnd theorems, math tuition оffers specialized drills t᧐ guarantee
trainees ϲan tackle these with precision аnd sеⅼf-confidence.
Attending tⲟ specific discovering styles, math tuition mɑkes certain junior college students understand subjects аt their oᴡn speed f᧐r A Level
success.
OMT attracts attention ԝith itѕ curriculum designed tο sustain MOE’s ƅy incorporating mindfulness techniques tⲟ minimize mathematics anxiousness
tһroughout researches.
Comprehensive services offered ⲟn-line leh, training уoᥙ eⲭactly һow to solve problеms properly fоr
much better grades.
Tuition emphasizes tіme management methods, critical for alloting efforts intelligently іn multi-ѕection Singapore math tests.
Ꮮߋoқ into my web page … online tuition singapore
https://fabeti.com.ua/
nfgroup.it
Hey There. I found your blog the usage of msn. That is a
very well written article. I’ll be sure to bookmark it and return to learn more of your helpful info.
Thanks for the post. I will certainly comeback.
Thanks designed for sharing such a pleasant idea,
article is good, thats why i have read it entirely
I am regular visitor, how are you everybody? This paragraph posted
at this website is actually good.
USDT privacy checklist
blurb.com
https://www.africangenesis-101.org/profile/xbetpa997175/profile
I’m really enjoying the theme/design of your
site. Do you ever run into any web browser compatibility issues?
A couple of my blog audience have complained about my site not working correctly
in Explorer but looks great in Chrome. Do you have any suggestions to help fix this problem?
I have read so many articles or reviews about the blogger lovers except this article is
truly a nice piece of writing, keep it up.
continue
порно онлайн
https://giphy.com/channel/AmosBullock4
A person necessarily help to make seriously articles I’d state.
This is the very first time I frequented your website page and thus far?
I amazed with the research you made to make this actual submit incredible.
Fantastic process!
Here is my homepage: cyberpunk style
I really like what you guys are up too. This kind of clever
work and exposure! Keep up the fantastic works guys I’ve added you
guys to blogroll.
For newest news you have to visit the web and on world-wide-web
I found this web page as a finest web site for latest updates.
Nice post. I learn something new and challenging on sites I stumbleupon on a daily
basis. It will always be useful to read articles from other authors and use
a little something from other sites.
my homepage: streetwear style
Hello my loved one! I wish to say that this post
is awesome, nice written and include almost all significant infos.
I’d like to see more posts like this .
Feel free to visit my page; techwear kaufen
SNS에서 자주 보이는 울산호빠에서 기분 좋은 하루를 보내보세요 모든 게 완벽했어요